Loading...
Searching...
No Matches
Unreal Blueprints
Blueprint Classes usable in Unreal. More...
Files | |
| file | unreal/inkcpp/Source/inkcpp/Public/InkDelegates.h |
| collection of Delegates typs used for the UE interface | |
Classes | |
| class | UInkAsset |
| Assets containing a InkCPP .bin. More... | |
| class | UInkChoice |
| Representing a Ink Choice in the story flow. More... | |
| struct | FInkHandle |
| Generic registration handle returned by all Register* functions on AInkRuntime and UInkThread. More... | |
| struct | FListFlag |
| A single flag of a list. More... | |
| class | UInkList |
| Allows reading ink lists. More... | |
| class | AInkRuntime |
| Instantiated story with global variable storage and access, used to instantiate new threads. More... | |
| struct | FInkSnapshot |
| A serializable snapshot of a runtime state Can be used as variable in a USaveGame to be stored and reloaded. More... | |
| class | UInkMigratableSnapshotAsync |
| A helper class to create migratable snapshots. More... | |
| class | UInkThread |
| Base class for all ink threads. More... | |
| struct | FInkVar |
| A wrapper for passing around ink vars to and from ink itself. More... | |
| class | UInkVarLibrary |
| Conversion Methods for FInkVar. More... | |
| class | UTagList |
| Helpful tag list. More... | |
Enumerations | |
| enum class | EInkVarType : uint8 { EInkVarType::Float , EInkVarType::Int , EInkVarType::UInt , EInkVarType::Bool , EInkVarType::String , EInkVarType::List , EInkVarType::None } |
| Label for types possible contained in a FInkVar. More... | |
Detailed Description
Blueprint Classes usable in Unreal.
An example can be found here, do not forget to install the plugin via the marketplace or unzipping the unreal_X_x.zip from the release page to /AN_TEMP_DIRECTORY/ and build it with:
/UNREAL_ENGINE/Build/BatchFiles/RunUAT.bat BuildPlugin
-plugin=/AN_TEMP_DIRECTORY/inkcpp/inkcpp.uplugin -package=/YOUR_UNREAL_PROJECT/Plugins/inkcpp
-TargetPlatforms=Win64
And either way activating the plugin.
The C++ API is available — include the plugin headers directly from your game module after adding "inkcpp" to your module's PublicDependencyModuleNames in Build.cs.
Setup
After installing the plugin (see above) you need to activate it via Plugins->.... Then to run your Ink script you need a instance of AInkRuntime. The story will only proceed if this actor is active.
On this instance set the Ink|InkAsset property to the story that you will run. To create this InkAsset you need to import a .ink file or .ink.json file.
With the AInkRuntime you can then create a UInkThread with AInkRuntime::Start(). In addition does the runtime allows you access to the global variables via observer or directly setter und getter.
Notice that all threads spawned in the same runtime will share a global state. So if you want to play the same story with different states, you need multiple runtimes.
The UInkThread class provides will fire events when new context is available. The easiest way to implement then is to create a custom Blueprint based on UInkThread. For a overview see Thread.
Below you can find the blueprints of a minimal example. Which is included for further inspection inside the Example project (in the map Minimal).
Components
Runtime
The AInkRuntime handles the runtime as actor. At every Tick all UInkThread of the runtime will be further executed if appropriate.
The asset containing the story to run can be set via the Ink|InkAsset attribute.
The runtime is the position to set observer (e.g. AInkRuntime::ObserverVariableChange() ) and create new threads (AInkRuntime::Start() & AInkRuntime::StartExisting() ).
It is advised to create you own Blueprint which inherits AInkRuntime to overwrite the events as necessary.
Thread
A UInkThread is like a pointer inside the story. It contains information can advance and will thereby output the context it encounters.
All threads inside the same runtime will share the same variables but can be at different points in the story.
The most important events/functions are:
- UInkThread::OnLineWritten() which is called by each new line of output
- UInkThread::OnChoice() which is called if a choice is encountered and must be handled
- UInkThread::PickChoice() to pick a choice and continue the thread.
Choice
A UInkChoice contains all data relevant for a branch at a choice point.
- UInkChoice::GetText() the text of the choice
- UInkChoice::GetIndex() the index used in UInkThread::PickChoice()
- UInkChoice::GetTags() tags associated with this branch/choice
TagList
A UTagList is a wrapper for the array of tags each line of context and each choice can have.
InkVar
A wrapper for variables of the ink runtime. To get/set variables you need access to the runtime: AInkRuntime::GetGlobalVariable(), AInkRuntime::SetGlobalVariable()
please note that get returns a copy of the variables value and to change it you need to call set.
InkList
UInkList is a wrapper for the list type inside ink. A ink list is like a set for enum values. For a in depth explanation please refer to the official guide
If you define Enums similar to the Lists in the ink script you can use them for an easier access.
The Example project
Setup
To setup the example project install the Plugin via the UE marketplace place unpack the unreal_X_x.zip from the release page inside /PATH/InkCPP_DEMO/Plugins/.
Next open the project via the InkCPP_DEMO/InkCPP_DEMO.uproject file.
Than you can hit play to run the demo.
The example contains two maps:
- `Demo`: An extensive example demonstrating many but not all features provided by inkCPP like:
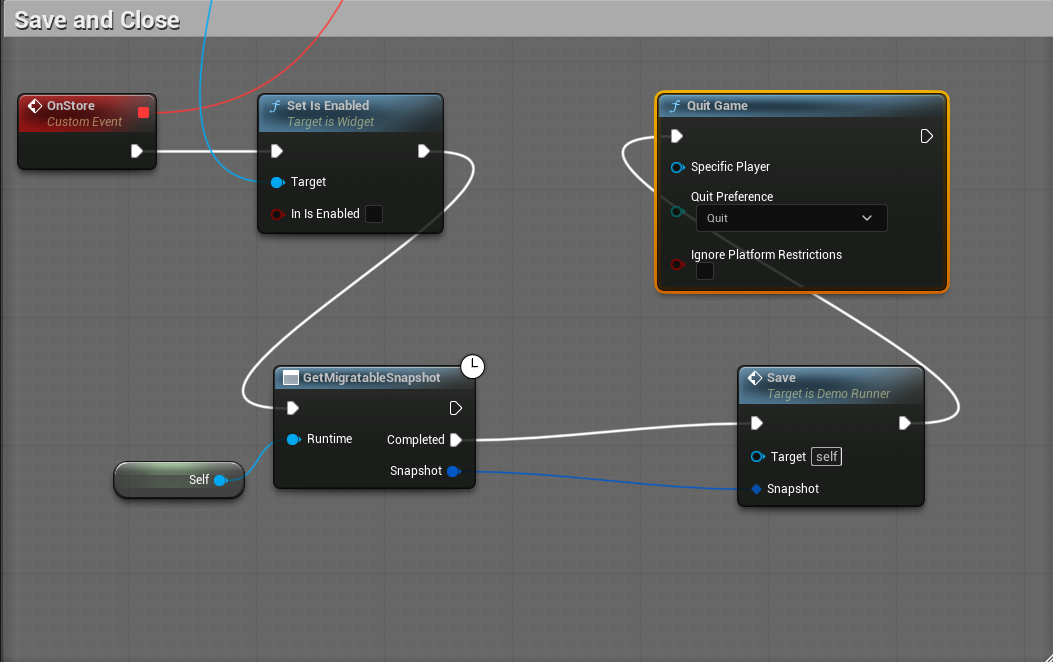
- snapshots: for creating save games
- observers: to easily reflect a variable of the ink story in the game.
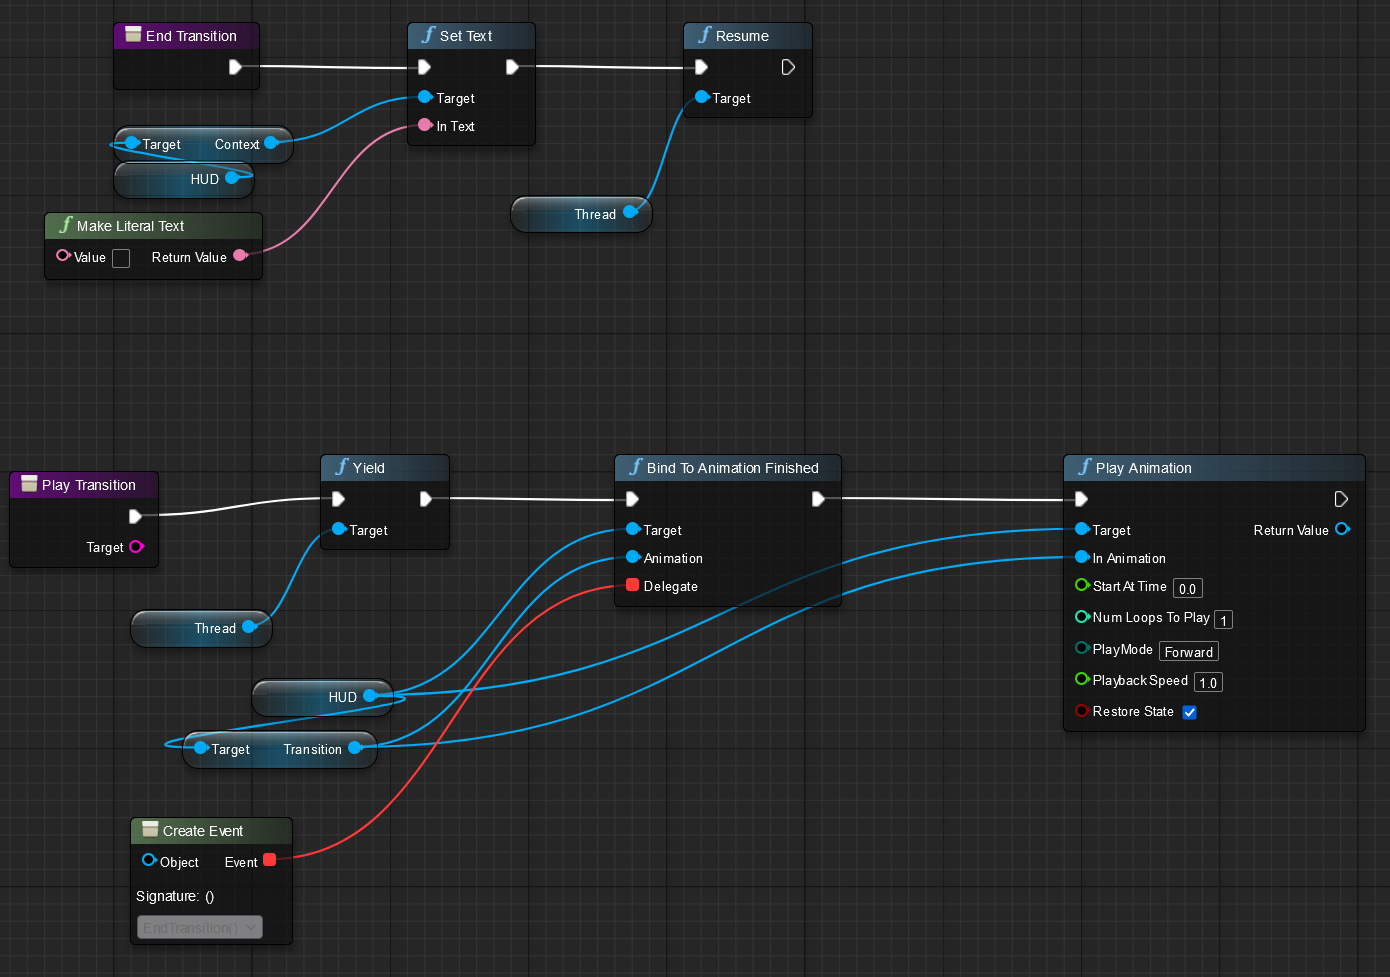
- external function + yield: to stop playing the story while the game plays a transition
- a second runner: for a inventory menu
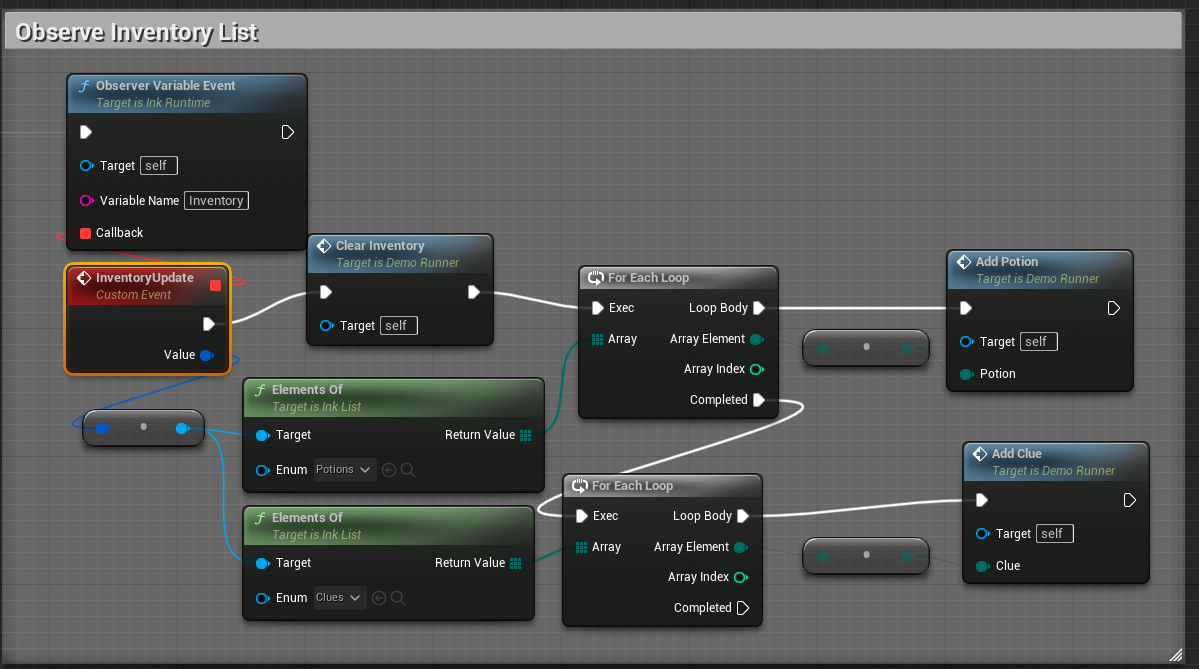
- interoperability between UE Enums and Lists in Ink
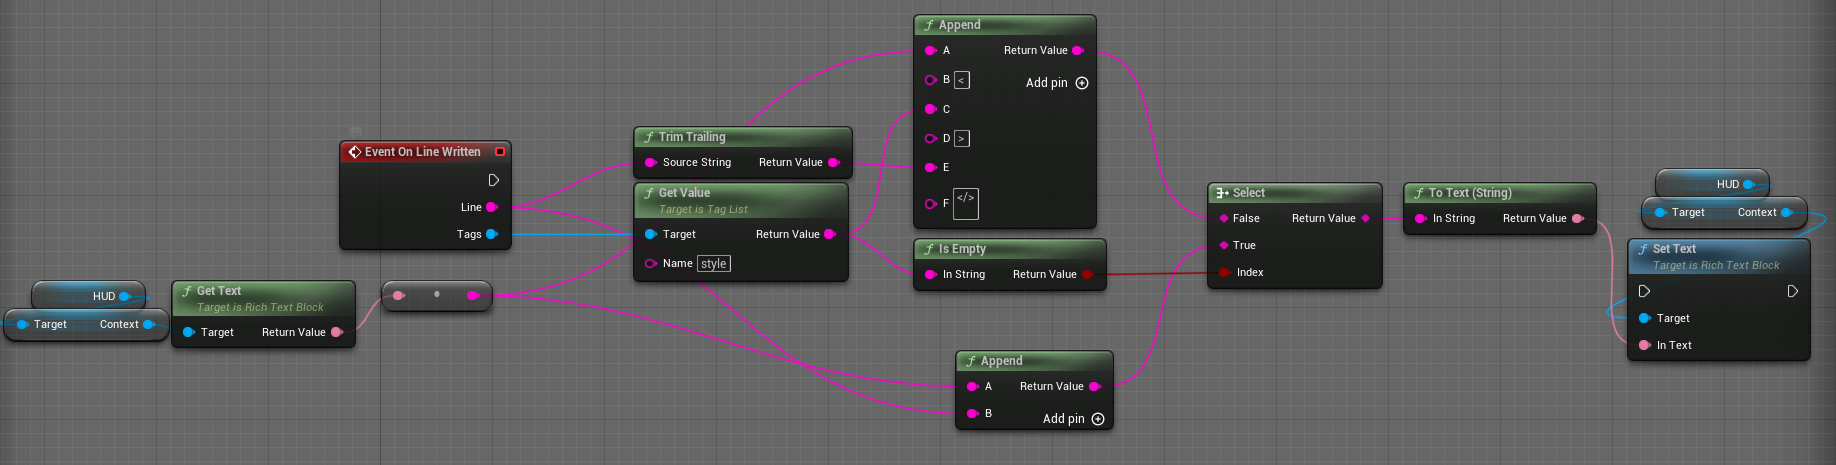
- Tag attributes: use tags to modify showed text
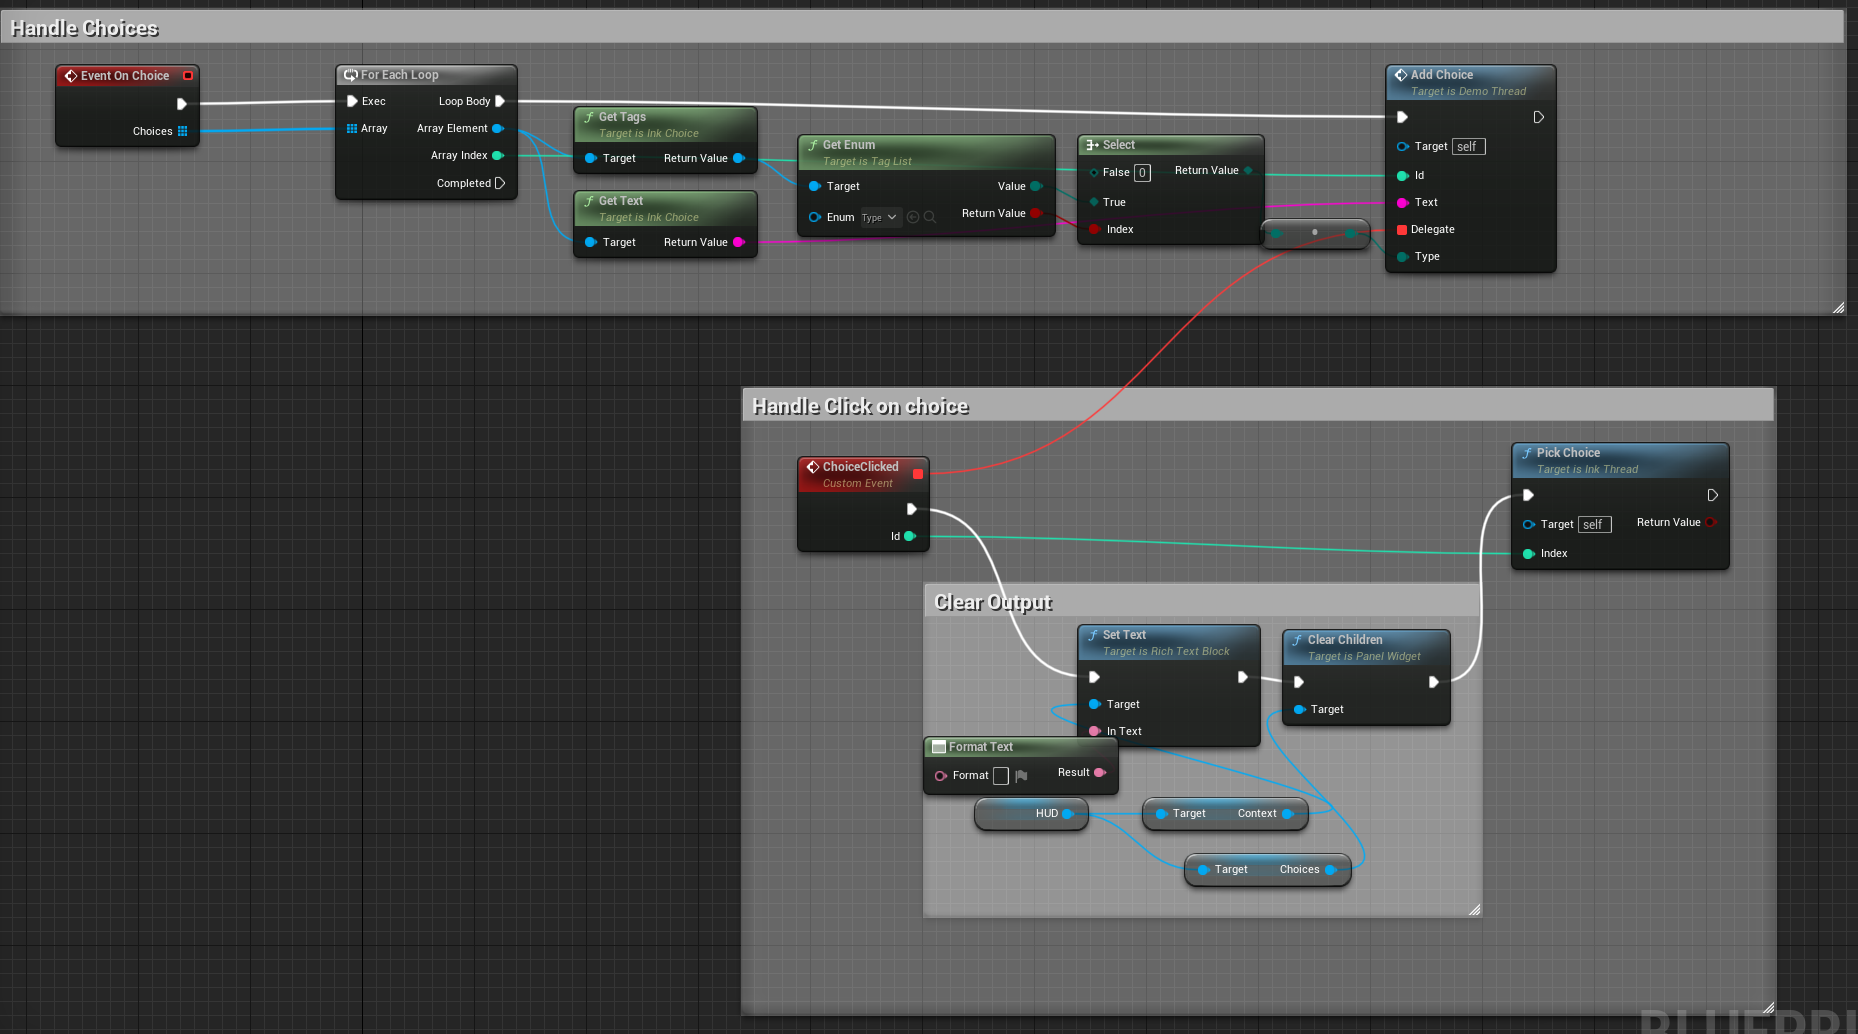
- Tag attributes as enums: use tags to modify choices
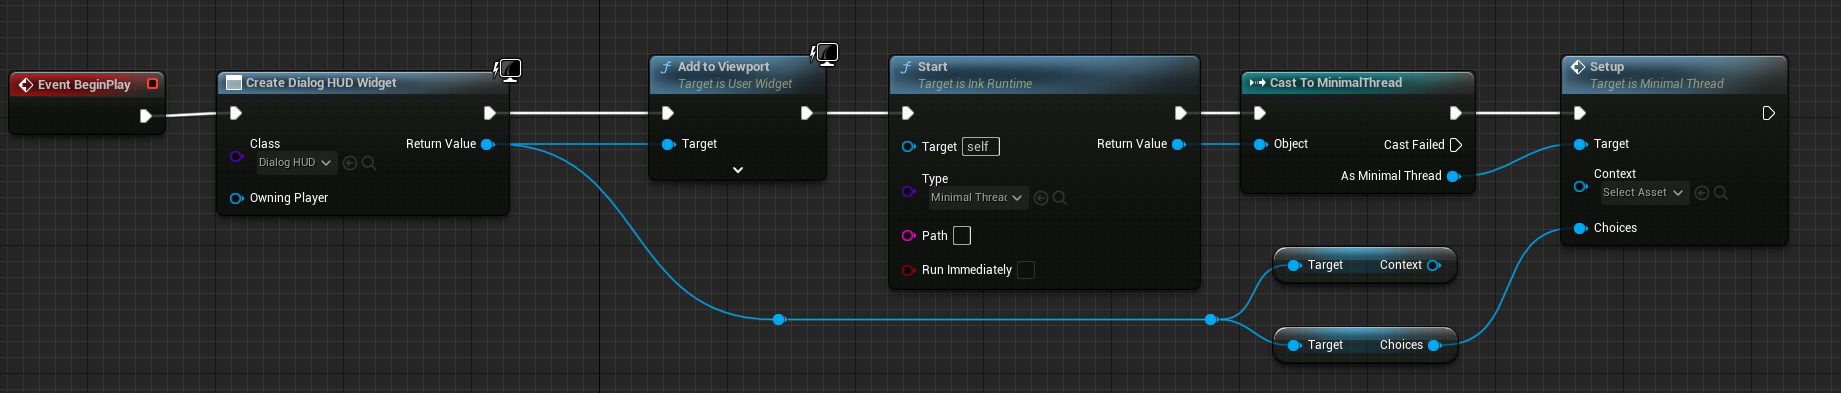
- `Minimal`: An example for a minimal, still sensible usage example of InkCPP in UE5.
Demo
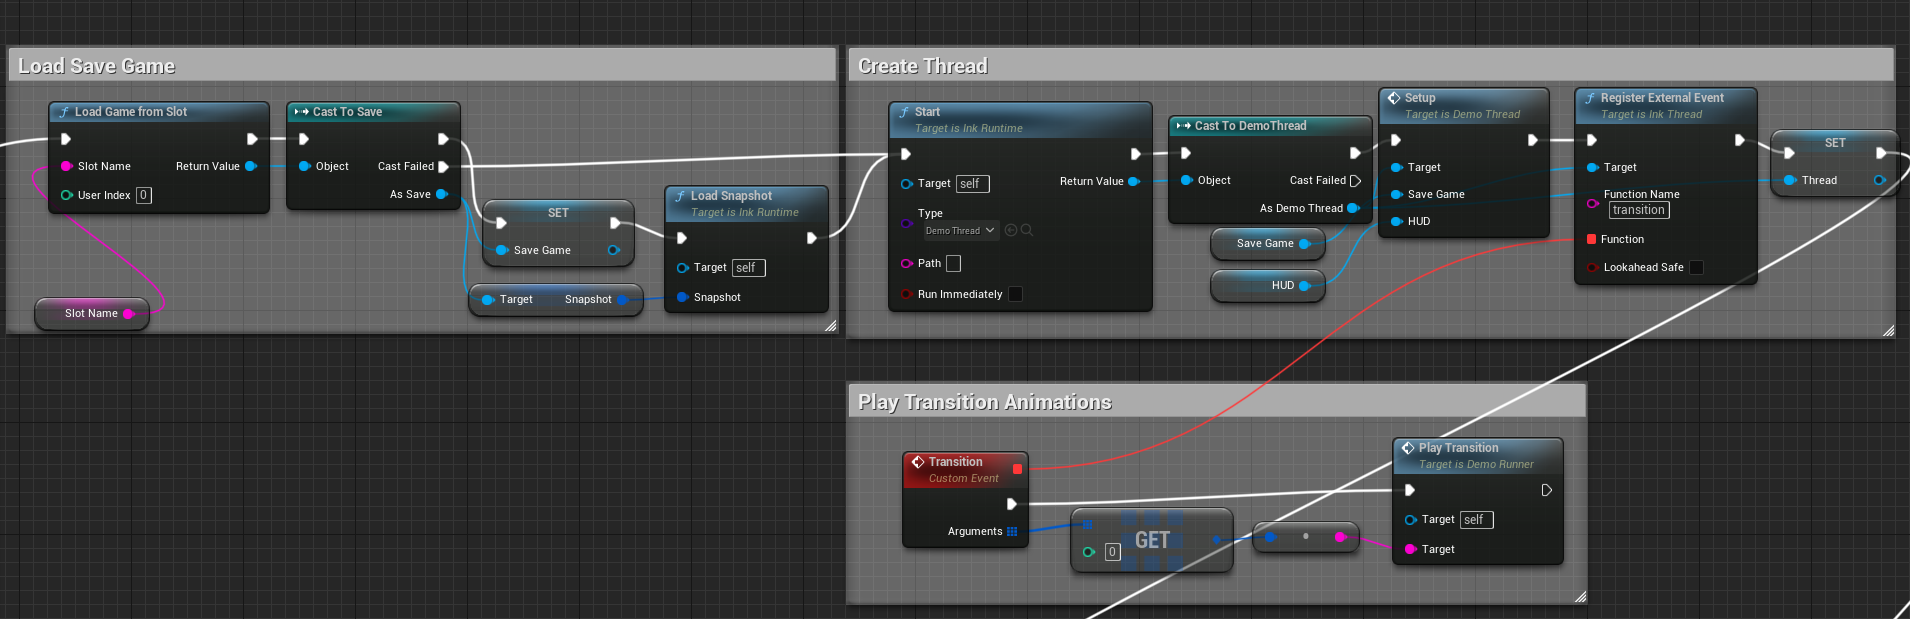
The Demo map contains the Actor DemoThread which is a child of InkRuntime. All UI elements and other used components are created on the BeginPlay event in the following order.
- The UI components are created and configured
- Load an existing save game if its exists (the Save game is stored at InkCPP_DEMO/Saved/SaveGames).
- Create the main thread of class DemoThread and register the external function.
- Create menu thread(InfoThread), set path to Wait to avoid any output in the beginning.
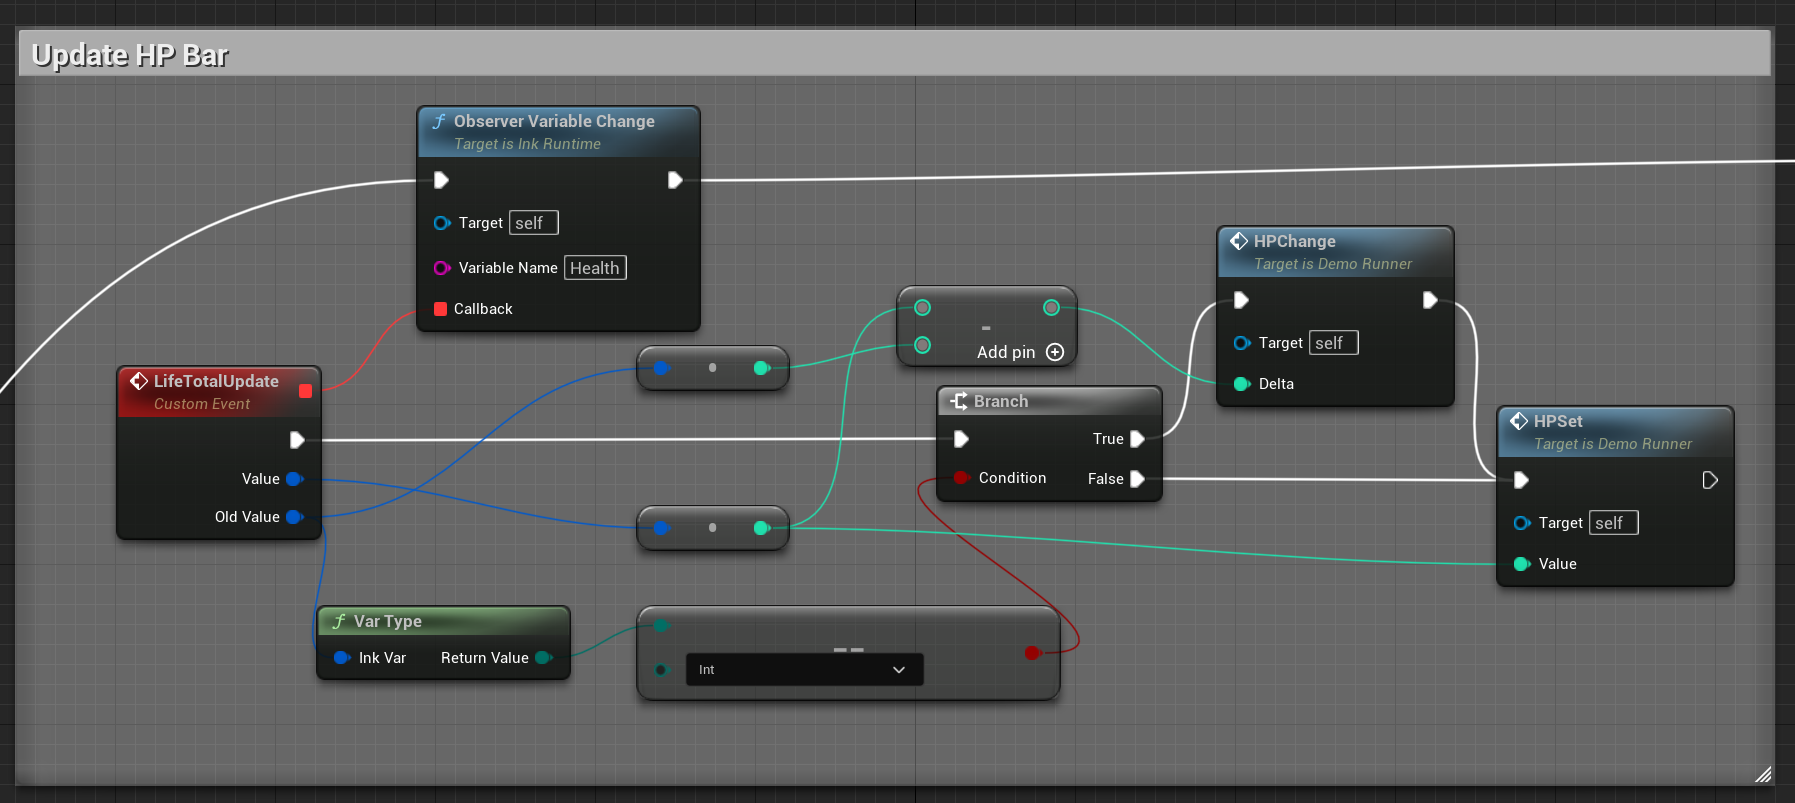
- Set observer for the variable Heath to update the healthbar.
- Set observer for the variable Inventory to update the inventory columns.
UI
- DialogHUD contains all static UI elements.
- Context: text box containing the lines of the ink story.
- Choices: A container which should be populated with the choice buttons
- Clues & Potions: container which should be populated with inventory buttons
- SC_Button: Button to trigger save and close action
- Health: health bar showing current health
- DMG_Numbers: container which should be populated with damage numbers
- Popup/PopupContext/PopopChoices: elements needed for the Info/"Item interaction thread"
- TransitionBlob: A animated entity used to simulate a transition.
- DMG_Number animated text block used to display damage numbers
- InventoryButton/ChoiceButton: Wrapper for buttons, primarily for attaching data to a button for a parameterized clicked event.
DemoRunner
DemoThread
Minimal

Enumeration Type Documentation
◆ EInkVarType
|
strong |